Showing posts with label Linux. Show all posts

Monday, June 8, 2015

Linux / UNIX FTP Commands Tutorial

switched from MS-Windows to Mac computer running OS X UNIX systems. I need to transfer and download file using ftp for my personal website. Can you provide me a list of FTP commands that may be sent to an FTP server, to upload and download files using UNIX / Linux ftp command line client?


File Transfer Protocol (FTP) is a network protocol used to copy a file from one computer to another over the Internet or LAN. FTP follows a client-server architecture which utilizes separate control and data connections between the ftp client and server. The default port for ftp is 21.

ftp: Internet File Transfer Program

Use the following syntax to connect to transfer files to and from a remote network ftp site:
ftp ftp.example.com
ftp 1.2.3.4
ftp user@ftp.example.com
You must know ftp username and password for user-based password authentication or with anonymous user access use ftp as both username and password. In this example, you are connecting to ftp.freebsd.org with anonymous user access (open the terminal and type the following command):
$ ftp ftp.freebsd.org
Sample session:
Trying 87.51.34.132...
Connected to ftp.freebsd.org.
220 ftp.beastie.tdk.net FTP server (Version 6.00LS) ready.
Name (ftp.freebsd.org:vivek): ftp
331 Guest login ok, send your email address as password.
Password:
230 Guest login ok, access restrictions apply.
Remote system type is UNIX.
Using binary mode to transfer files.
ftp>
When you enter your own loginname and password for the ftp.example.com server, it returns the prompt
 ftp>
You need to type all commands in front of the ftp> prompt.

Task: List Current File

Type the ls command at ftp> prompt:
ftp> ls
Sample outputs:
229 Entering Extended Passive Mode (|||60692|)
150 Opening ASCII mode data connection for '/bin/ls'.
total 10
drwxrwxr-x  2 0     5      512 Jul 19  2007 .snap
drwx------  2 0     0     2048 Jul 19  2007 lost+found
drwxr-xr-x  3 1006  1006   512 Sep 21  2009 pub
drwxr-xr-x  3 1006  1006   512 Jun  5  2007 sup
drwxr-xr-x  4 1006  0      512 Sep 18  2009 www
226 Transfer complete.
ftp>
The above will list the names of the files in the current remote directory (the last name is file or dir name).

Task: Change Directory

To change directory on the remote machine use cd command:
ftp> cd dirName
To change to pub directory, enter:
ftp> cd pub
Sample outputs:
250 CWD command successful.

Task: Download / Copy file

To copy one file at a time from the remote ftp server to the local system use get command:
get fileName
get fileName newFileName
In this example, download file resume.pdf in the current remote directory to (or on top of) a file with the same name, resume.pdf, in your current local directory:
ftp> get resume.pdf
Sample outputs:
local: resume.pdf remote: resume.pdf
229 Entering Extended Passive Mode (|||55093|)
150 Opening BINARY mode data connection for 'resume.pdf' (53077 bytes).
100% |*********************************************************************| 53077       12.58 KiB/s    00:00 ETA
226 Transfer complete.
53077 bytes received in 00:04 (12.57 KiB/s)
In this example, copies file data.tar.gz in the current remote directory to (or on top of) a file named backup.tar.gz in your current local directory:
ftp> get data.tar.gz backup.tar.gz

Change Local Directory

To change directory on your local system, enter:
ftp> lcd /path/to/new/dir
ftp> lcd /tmp
Sample outputs:
Local directory now: /tmp
Print local directory:
ftp> lpwd
Sample outputs:
/tmp
The lpwd command prints current download directory for local systems. However, to find out the pathname of the current directory on the remote ftp server, enter:
ftp> pwd
Sample outputs:
Remote directory: /pub/FreeBSD

Task: Download Multiple Files

You need to use mget command as follows to copy multiple files from the remote ftp server to the local system. You may be prompted for a yes/no (Y/N) answer before transferring each file (you can disable prompt by passing the -i option to ftp client). To download all files, enter:
ftp> mget *
To download all perl files (ending with .pl extension), enter:
ftp> mget *.pl

Task: Turn On / Off Interactive Prompting

The ftp command prompt sets interactive prompting; "on" which enables prompting so that you can verify of each step of the multiple commands, "off" allows the commands to act unimpeded:
ftp> prompt on
ftp> mput *.php
ftp> prompt off
ftp> mget *.py

Task: Delete File

To delete a file in the current remote directory use delete command:
ftp> delete fileName
ftp> delete output.jpg

Task: Upload One File

To copy one file at a time from the local systems to the remote ftp server, enter:
ftp> put fileName
ftp> put logo.jpg
In this example, upload logo.jpg, enter:

Task: Upload Multiple Files

To copy multiple files from the local system to the remote ftp server use mput command. Again, you may be prompted for a yes/no (y/n) answer before transferring each file. In this example, upload all files from the current system:
ftp> mput *
ftp> mput *.pl

Task: Create a Directory

To make a new directory, enter:
ftp> mkdir dirName
ftp> mkdir scripts
ftp> cd scripts
ftp> pwd

Task: Delete a Directory

To remove or delete a directory, enter:
ftp> rmdir dirName
ftp> rmdir images
ftp> ls

Task: Set The Mode Of File Transfer

To set the mode of file transfer to ASCII, enter:
ftp> ascii
ftp> binary
Please note that ascii is the default and good for text files. To set the mode of file transfer to binary, enter:
The binary mode is recommended for almost all sort of files including images, zip files and much more. The binary mode provides less chance of a transmission error.

Task: Connect To Another FTP Server

To open a connection with another ftp server, enter:
ftp> open ftp.nixcraft.net.in
The above command opens a new FTP connection with ftp.nixcraft.net.in. You must provide a username and password for a ftp.nixcraft.net.in account. However, a username and password can be skipped for an anonymous FTP connection.

Task: Exit the FTP Session

Type quit or bye, enter:
ftp> quit
ftp> bye
OR
Sample outputs:
221 Goodbye.

How Do I Find Out More Information About The FTP Commands?

Type ? or help to get more information about the FTP commands:
ftp> ?
ftp> help
Sample outputs:
Commands may be abbreviated.  Commands are:
!  delete  idle  mode  pmlsd  reset  system
$  dir  image  modtime  preserve restart  tenex
account  disconnect lcd  more  progress rhelp  throttle
append  edit  less  mput  prompt  rmdir  trace
ascii  epsv4  lpage  mreget  proxy  rstatus  type
bell  exit  lpwd  msend  put  runique  umask
binary  features ls  newer  pwd  send  unset
bye  fget  macdef  nlist  quit  sendport usage
case  form  mdelete  nmap  quote  set  user
cd  ftp  mdir  ntrans  rate  site  verbose
cdup  gate  mget  open  rcvbuf  size  xferbuf
chmod  get  mkdir  page  recv  sndbuf  ?
close  glob  mls  passive  reget  status
cr  hash  mlsd  pdir  remopts  struct
debug  help  mlst  pls  rename  sunique
To get a short description about each command, enter:
ftp> help commandName
ftp> help chmod
Sample outputs:
chmod       change file permissions of remote file
ftp> help ls
Sample outputs:
ls          list contents of remote path

FTP Through A Browser

If you do not want to type the commands, than use a browser such as Safari, Firefox and type the following:
ftp://ftpUserName@ftp.nixcraft.net.in
ftp://ftp.freebsd.org/
ftp://ftp@ftp.freebsd.org/
ftp://userName:Password@ftp.nixcraft.net.in/
ftp://ftp:ftp@ftp.freebsd.org/

Source : cyberciti
0

Wednesday, June 3, 2015

Install Mdk3 di Ubuntu 14.04 (LTS)


This day I wanna show you how to install mdk3 on Ubuntu 14.04.
What mdk3-v6 do:

  • Bruteforce MAC Filters
  • Bruteforce hidden SSIDs (some small SSID wordlists included)
  • Probe networks to check if they can hear you intelligent Authentication-DoS to freeze APs (with success checks)
  • FakeAP - Beacon Flooding with channel hopping (can crash NetStumbler and some buggy drivers)
  • Disconnect everything (aka AMOK-MODE) with Deauthentication and Disassociation packets
  • WPA TKIP Denial-of-Service
  • WDS Confusion - Shuts down large scale multi-AP installations
First get last mdk3 version:

wget http://linux.gungoos.com/mdk3-v6.tar.gz
tar xvzf mdk3-v6.tar.gz
cd mdk3-v6

Now get patch and patch Makefile:

sudo apt-get install patch
wget http://linux.gungoos.com/mdk3-v6.patch
patch Makefile < mdk3-v6.patch
rm mdk3-v6.patch

Now install mdk3:

sudo make
sudo make install

Now start mdk3 from terminal (to see all options):

sudo mdk3
 voila, now you can use mdk3.

source
10

Install Arduino IDE 1.6.x on Ubuntu


Hello this day I will show you how to install Arduino IDE especially Arduino 1.6.x, because of my arduino board is yun so I must install this version. This article describes the steps to install the Arduino IDE in Ubuntu 14.04 LTS (Trusty Tahr).
First you should download from Official Web Arduino. Choose the version you want, in this case I use arduino IDE version 1.6.4 64 Bit.
Extract the archive and move it to the /opt folder, in a terminal window enter:

cd ~/Downloads
tar -xJf arduino-1.6.4-linux64.tar.xz
sudo mv arduino-1.6.4 /opt

if you`re machine doesn`t have jdk, you must install it first:
sudo apt-get install openjdk-7-jre
To use the USB port the permissions need to be set to read and write with:
sudo chmod a+rw /dev/ttyACM0
If you use multiple Arduinos, you can use the same method, just raise the number of the port, e.g. /dev/ttyACM1.
Create a shortcut on the desktop:
cd ~/Desktop
ln -s /opt/arduino-1.6.4/arduino
Ubuntu opens executable text files with an editor instead of executing them. To be able  execute a file, open the ‘Files’ program from the launcher, go to menu ‘Edit’, ‘Preferences’, tab ‘Behavior’ and set ‘Executable Text Files’ to ‘Ask each time’.


1

Installing WPS on Ubuntu 14.04 LTS or Newer

Assalamualaikum.
pada kesempatan kali ini saya akan memberikan tutorial menginstall wps, wps merupakan salah satu program office yang mirip dengan office kepunyaannya microsoft. kelebihannya tentu saja free. klik link ini untuk menuju web resminya.


berikut ini tutorial installnya:
Untuk 32 bit
sudo apt-get install gdebi
wget http://kdl.cc.ksosoft.com/wps-community/download/a16/wps-office_9.1.0.4885~a16_i386.deb 
wget http://wps-community.org/download/tools/fix-menu.sh
sudo gdebi wps-office_9.1.0.4885~a16_i386.debsudo chmod +x fix-menu.shsudo ./fix-menu.sh

Untuk 64 Bit 
sudo apt-get install gdebi
sudo dpkg --add-architecture i386
sudo apt-get update
wget http://kdl.cc.ksosoft.com/wps-community/download/a16/wps-office_9.1.0.4885~a16_i386.deb 
wget http://wps-community.org/download/tools/fix-menu.sh 
sudo gdebi wps-office_9.1.0.4885~a16_i386.deb
sudo chmod +x fix-menu.sh
sudo ./fix-menu.sh
sudo apt-get install libxext6:i386
wps
0

Sunday, September 29, 2013

Install XDM di Linux

Jika di sistem operasi windows kita mengenal IDM sebagai download manager maka jika di linux kita mengenal XDM yg gak kalah canggihnya dengan IDM. Pada postingan kali ini saya akan share mengenai cara instalasi XDM di Kali Linux.
Tapi eitss cek dulu versi java di linux kamu, caranya ketikkan perintah terminal:

java -version

kalo belum terinstall maka install dulu java runtime environment (JRE) dengan perintah berikut:

sudo add-apt-repository ppa:ferramroberto/java
apt-get update
sudo apt-get install sun-java6-jre sun-java6-plugin sun-java6-fonts

 Install Xtreme Download Manager
1. Download xdman dulu disini atau melalui wget dengan mengetikkan perintah berikut di terminal

wget -O xdman.zip http://sourceforge.net/projects/xdman/files/xdman.zip/download

 2. Ekstrak xdman.zip dan masuk ke direktori ekstraksi-nya
mkdir xdman

unzip xdman.zip -d xdman/

 3. Ubah dahulu permission dengan perintah berikut melalui terminal
cd xdman/
chmod +x xdman.sh
4. Langsung jalankan dengan mengetikkan perintah berikut
./xdman.sh
Integrasikan XDM Dengan Browser
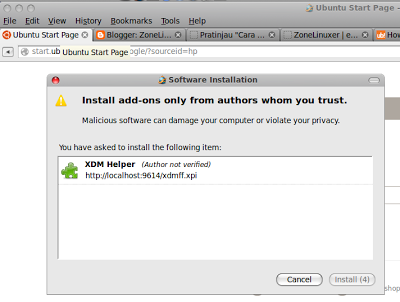
1. Jalankan xdman dan firefox secara bersamaan. Pada window xdman, buka "Tools > Browser Integration" seperti gambar berikut
Klik icon "panah" dan drag ke window Firefox kemudian akan di-pop up window baru seperti dibawah ini
Klik "install" dan tutup window Firefox dan xdman sekaligus.
2. Untuk menjalankan/ sekedar mengecek, jalankan xdman terlebih dahulu baru jalankan firefox. Ingat! selalu jalankan terlebih dahulu xdman!
3. Bila tidak dapat mendownload melalui xdman. Tambahkan proxy berikut terlebih dahulu. (Gunakan cara ini untuk integrasi xdman pada browser sepert chrome, safari atau iceweasel)
http://localhost:9614/proxy.pac

4. Untuk browser chrome, Anda dapat mengubah proxy di "Settings>Change Proxy Setting". Perhatikan gambar berikut

Kemudian check dengan meng-copy url berikut
http://localhost:9614/test
1

Seni Mempercantik Tampilan Terminal Linux Kali

Bosan dengan terminal linux yang flat dan gitu-gitu aja??? 
Kali ini saya memposting seni mempercantik tampilan terminal linux. Salah satu caranya yaitu dengan menggunakan tools figlet dan cowsay, Langsung to the point aja deh gak pake ribet.
Berikut contoh tampilan terminal saya.
pertama buka terminal dan install paket figlet serta cowsay
apt-get install figlet
apt-get install fortune cowsay
setelah semua paket terinstall saatnya untuk mengedit bash. Sebenarnya hanya membutuhkan sedikit pengetahuan tentang pemograman shell bash. saya akan menjelaskan nantinya. File .bashrc berada pada home directory anda dan menjadi patokan dasar command ketika anda memasukin shell anda sebagai user biasa maupun sebagai root. Dilihat dari tanda titik di depan , maka file ini dalam mode invisible atau ter-hidden. Sebelum mengedit file bashrc ada baiknya untuk di backup dulu.
cp .bashrc .bashrcbackup
Selesai backup kita edit-edit dengan menggunakan text editor kesayangan kita. Anda bisa menggunakan vi, vim , nano , gedit, dll.
gedit .bashrc
kurang lebih tampilannya seperti ini:

berikut ini settingan saya, silahkan download atau cukup lihat di pastebin, letakkan di paling bawah.
berikut akan saya jelaskan sedikit:
Line 28
# function & script : kita dapat menaruh fungsi-fungsi dan script-script tertentu. misalnya saya buat sebuah fungsi dan saya beri nama deviskali(). hmm fungsi itu saya isikan dengan fungsi if then. jadi itu sebagai akses code lagi. 
Line 32
if [ "$dexvils" == "1611" ] ; then
ketika saya memasuki shell saya akan diminta code pengaman sederhana yang saya buat.

Nah untuk ascii artnya perhatikan line 107
echo -e "${lightgreen}";figlet -f  digital "devis@dexvils"
kita tinggal menggunakan figlet agar keluar “devis@dexvils hehehe .. kemudian apalagi ya.. oh iya klo kita ingin merubah nama root secara default, khususnya bagi pengguna backtrack yang menggunakan akses root sebagai default. ok cari shell prompt yang biasanya menggunakan variable PS1. Nah pada deklarasi variabel tersebut coba cari kata-kata ini “\u@\h\” ganti \u dengan nama yang anda inginkan. save terus reboot.. alhasil tampilan kata root pada prompt akan berubah..
Line 103
# Spicing up Terminal
/usr/games/fortune | /usr/games/cowsay -f ghostbusters
echo
           - f       = font
ghosbusters = gambar ghosbuster
jika anda ingin mengganti gambarnya bisa ketikkan perintah berikut di terminal:
ls /usr/share/cowsay/cows/

Demikian postingan saya kali ini semoga bermanfaat..
credit @ zee-eichel
1

Labels

Popular Posts